

Authentication is an essential part of web development. It is how we verify that a user is who they say they are and give them access to the appropriate resources. However, implementing authentication can be a challenging task, especially when it comes to security. Fortunately, Next-Auth provides a simple and secure solution for authentication in Next.js applications. In this post, we will explore how to use Next-Auth with GoogleProvider and email magic links and discuss why passwords are no longer a secure way of authentication.
Why We Shouldn't Use Passwords Anymore
Passwords are no longer considered a secure way of authentication due to the number of data breaches that have exposed users' passwords. Passwords are often reused across multiple services and are susceptible to dictionary and brute force attacks. Furthermore, users often choose weak passwords that can be easily guessed by attackers. A better way to authenticate users is to use stronger and more secure methods such as two-factor authentication (2FA) and magic links.
Using Next-Auth with GoogleProvider
Next-Auth provides support for various authentication providers such as GoogleProvider, Facebook, GitHub, Twitter, and more. Here's an example of how to use GoogleProvider with Next-Auth in your Next.js application.
- Install next-auth.
npm install next-auth
- Create a route handler with the app directory. You should be using that by now. Inside it, we will declare our provider in the authOptions. We will get our clientId and secret later on, but we will declare them now.
/app/api/auth/[...nextauth]/route.ts

export const authOptions = {
  providers : [
    GoogleProvider({
    clientId: process.env.GOOGLE_CLIENT_ID,
    clientSecret: process.env.GOOGLE_CLIENT_SECRET
  })
],
pages: {
  signIn: '/login'
}
}

const handler = NextAuth(authOptions)

export { handler as GET, handler as POST }
- Now we need to create the login page. This, I am sure, you can design yourself, but the important part is the login button.
import { signIn } from 'next-auth/react'

 <Button
      className='w-full'
      onClick={() => signIn('google')}
    >
      Continue with Google
    </Button>
So simple, right?
- Well you're still missing your clientId and secret, so don't try it just yet. Here's how to get them.
*https://console.developers.google.com/apis/credentials *
You click the link above to go into your google developer console.
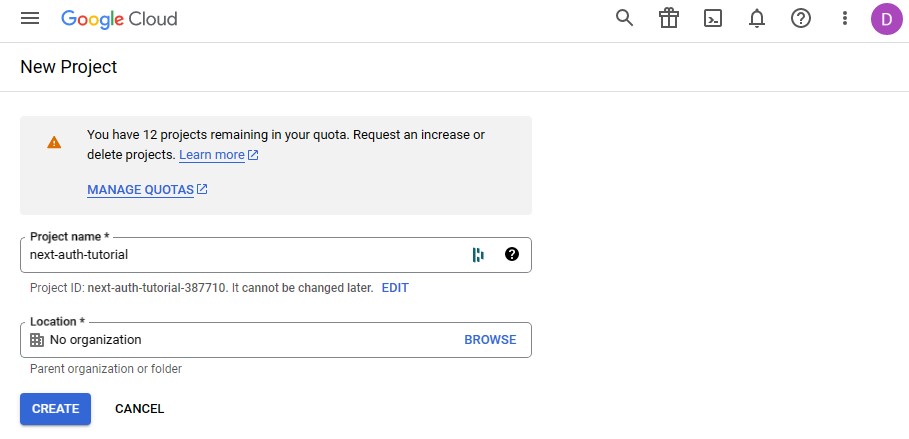
Create your project.
Name it and hit create.
Now at the top, click '+ create credentials' and then 0auth client id.

The last step in Google is to add an authorized redirect URL. This will have to change when in production to your domain.

Insert those into your .env file and you are almost there.
-
Your authentication implementation is close. Users have access to the functionality of a login system, but it won't work just yet until it's hooked up with a database. It can work without one if it's for internal tools, but for a consumer facing application, you'll need to persist those accounts in a database. For this, we will use MongoDB. I'll assume you know to set up a free MongoDB cluster. If not, there are many many tutorials showing how to do this.
-
We will now interact with that database and we will use Prisma as our ORM. I love the ease of Prisma, it's so intuitive. We will need the following 3 packages.
npm install @prisma/client @next-auth/prisma-adapter
npm install prisma --save-dev
Let's go ahead and create a folder and file as below.
generator client {
  provider = "prisma-client-js"
}

datasource db {
  provider = "mongodb"
  url      = env("DATABASE_URL")
}

model Account {
  id String @id @default(auto()) @map("_id") @db.ObjectId
  userId             String   @db.ObjectId
  type               String
  provider           String
  providerAccountId  String
  refresh_token      String?  @db.String
  access_token       String?  @db.String
  expires_at         Int?
  token_type         String?
  scope              String?
  id_token           String?  @db.String
  session_state      String?
  user User @relation(fields: [userId], references: [id], onDelete: Cascade)
  @@unique([provider, providerAccountId])
}

model Session {
  id String @id @default(auto()) @map("_id") @db.ObjectId
  sessionToken String @unique
  userId String @db.ObjectId
  expires DateTime
 user User @relation(fields: [userId], references: [id], onDelete: Cascade)
}

model User {
  id String @id @default(auto()) @map("_id") @db.ObjectId
  email String @unique
  emailVerified DateTime?
  name String?
  image String?
  accounts Account[]
  sessions Session[]
}

model VerificationToken {
  id String @id @default(auto()) @map("_id") @db.ObjectId
  identifier String
  token      String   @unique
  expires    DateTime

  @@unique([identifier, token])
}
This is everything you need to connect users, sessions and accounts for the schema. You will need to grab your database url from MongoDB and add it to your .env file.
- Next, we'll add a file to our lib folder, assuming you have one, and we'll call it db.jsx/tsx/js.ts whichever you are working. This file just deals with Next.js hot reloading to ensure we don't create a lot of prisma clients.
import { PrismaClient } from "@prisma/client"

let prisma
if (process.env.NODE_ENV === "production") {
  prisma = new PrismaClient()
} else {
  if (!global.cachedPrisma) {
    global.cachedPrisma = new PrismaClient()
  }
  prisma = global.cachedPrisma
}

export const db = prisma
- Our schema is set up and now all we have to do is push our schema to Prisma.
npx prisma db push
We are done. Congratulations, you have authentication in Next.js